So you’ve decided to deploy your tags through Dynamic Tag Management (DTM). First off, congratulations on making the plunge. You’ll look back and think how archaic the old method was of adding tags and jumping through all the hoops of your IT department.
Now it’s time to start setting up your tags. However, getting started with DTM can be much like getting behind the wheel of a car for the very first time. You know of the power and capabilities it can bring, but you don’t quite know what each button or lever does. Read on as I detail the main areas of the DTM interface.
The “Overview” tab.
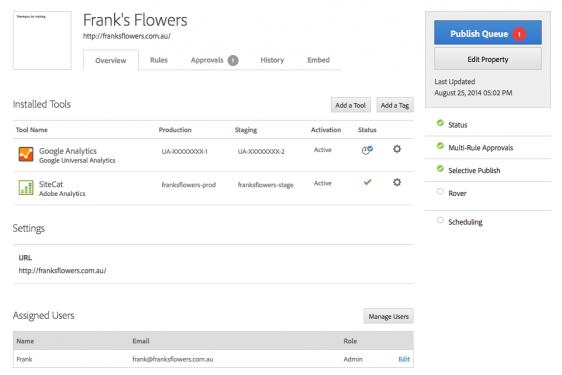
When you select your web property you’ll be shown the Overview tab which, as the name suggests, gives an overview of the tools already installed for the web property. The installed tools can be thought of as the basic page tag for a specific tool, but with the bonus of having additional configuration options. For example, some of the bonus configuration options for Adobe Analytics are enabling link tracking for tracking download links, customising the cookie, setting global eVars and props, and customising the code to name a few.
If you have an additional analytics tool you wish to add, simply click the ‘Add a tool’ button, select the tool type and enter the configuration information. At time of writing, the tools available are Adobe Analytics, Adobe Audience Management, Adobe Media Optimizer, Adobe Target, Google Analytics and Google Universal Analytics. You won’t be able to add these tools for inclusion into rules until they are added to the web property. And don’t worry if your analytics tool is missing from the tool list as you can still add additional Javascript / Third Party Tags to any rule to trigger on the site.
You can also see the users that have permissions for the web property from the Overview screen, as well as edit the web property settings if need be.
The “Rules” tab.
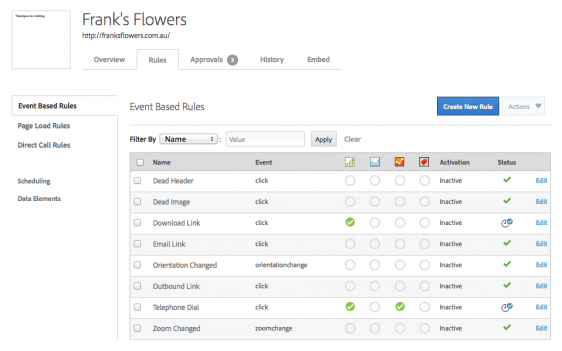
The Rules tab is where you will be spending most of your time within Dynamic Tag Manager (DTM). It is here you define when you want your tags to fire and what data to send. Think of DTM as a rule based system – if the criteria of this rule is met, then trigger this tool/script/HTML.
A rule has two parts:
- The Identifier is what you want the rule to look for. These conditions need to be met for the rule to trigger.
- The Trigger occurs after a rule’s conditions are met. You can associate as many different triggers to each rule as you wish. For example, for a rule to identify the submission of a lead form, you can trigger Adobe Analytics, Google Analytics as well as any additional Javascript / Third Party Tags, all under the one rule.
Be sure to be mindful of the following tag types when setting up any new tags:
- Event based rules: these are triggered when visitors interact with on-page elements. For example, a click of an element ID, submission of a form, or a play of a video. Think of these rules as those used to track all in-page interactions that happen after the page load.
- Page load rules: are triggered on the loading of a page. These could be set up by the URL, technology parameters like device type or browser, engagement parameters like returning visitor or time on site, or data elements that may appear on the page.
- Direct call rules: Direct call rules are used in situations where DTM can’t detect an event in the DOM or a new page load isn’t triggered. They are most commonly used for flash or ajax based events. To use a Direct call rule, the Direct calls are triggered via _satellite.track (‘stringValue’). This JavaScript is required to be triggered onsite at the point you wish to trigger your direct call rule. You then take the stringValue specified in the JavaScript and input it into the direct rule firing conditions in DTM.

Keep an eye out on the blog for more on Direct call rules.
DTM also has the ability to schedule your rules for specific campaigns that you may be running via the Scheduling (or my campaigns) sub menu. Here you can set up a start and an end date for a group of rules, view upcoming campaigns as well as past campaigns.
Data Elements.
Data elements let you pull data from any given page that you can then parse into various tags or use to set rules which are triggered based on a data element condition. Data elements can be anything from Javascript Objects, an element value retrieved via a CSS selector, Cookie values, a value from a URL query string parameter or a value from a custom JavaScript.
Essentially, data elements are used to create a data map of your site so that these data elements can be used for all Analytics and digital marketing tags through DTM. To delve deeper into data elements, be sure to read our article Using Data Elements within Adobe DTM.
The “Approvals” tab.
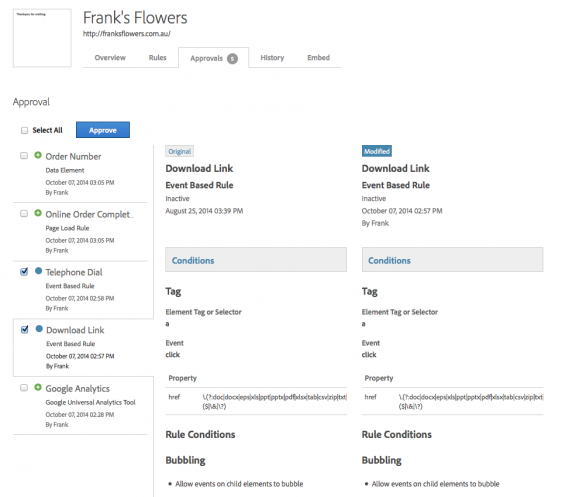
Once you have added/modified/deleted a rule or data element, you’ll have to go to the Approvals tab to approve them ready for publishing. You’ll be able to easily compare the original to the modified version of each change prior to hitting the approve button.
To test that your tools, rules and data elements awaiting approval are working prior to approval and publishing, Adobe have a DTM Switch plugin for Firefox and Chrome available for download. When you navigate to a website that has a DTM container, the plugin icon will appear in your browser toolbar where you can switch debug and staging modes on. The debug mode activates the DTM library to print what is happening to the console, and the staging mode uses the staging library instead of the production library.
The “History” tab.
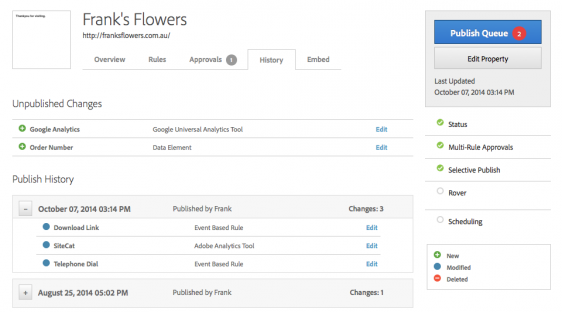
The History Tab lets you see the history of all published queues, who published them and what they contained. It is also from here that you will be able to publish any approved rules that haven’t been sent live yet.
The “Embed” tab.
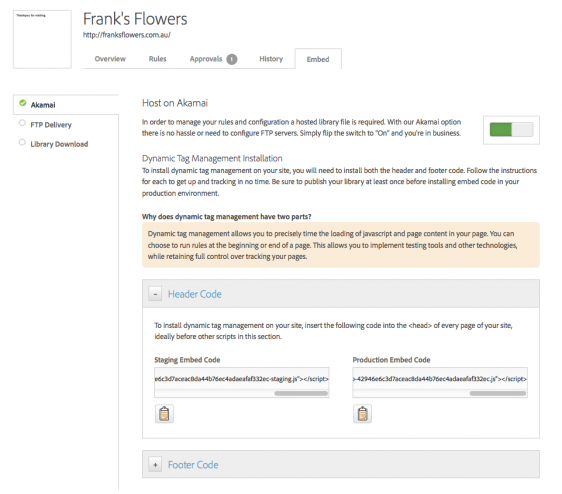
Here you will find the Digital Tag Management code you’ll need to install on the site as well as the deployment options (Akamai, self hosting via FTP delivery or the Library download option). Installation of the code should be fairly straight forward with two snippets of code to be applied to your site globally in the header and footer.
There you have it. A brief overview of how to navigate through the DTM interface to help you move from your L plates to your P plates. Be sure to keep your eye on our blog as we continue to explore DTM in future posts.